Day 33 : Working with Namespaces and Services in Kubernetes


Kubernetes has revolutionized the way we deploy, manage, and scale containerized applications. Among its many powerful features are Namespaces and Services, which play crucial roles in organizing and exposing resources within a Kubernetes cluster. Let's dive into what Namespaces and Services are, and how you can effectively work with them in your Kubernetes environment.
Understanding Namespaces and Services
Namespaces:
Namespaces provide a way to create virtual clusters within a single physical Kubernetes cluster. They are used to group and isolate resources such as Pods, Deployments, Services, and ReplicaSets. This isolation helps in organizing and managing applications and environments more efficiently.
When you create a Namespace, it acts as a separate logical partition within the cluster. Resources created within a Namespace are accessible only to other resources within the same Namespace, unless explicitly exposed or accessed from outside.
Services:
Services in Kubernetes are a fundamental mechanism for networking and exposing your application to other parts of the cluster or the external world. They provide a stable endpoint to access one or more Pods that are part of a Deployment, ReplicaSet, or StatefulSet.
Services enable load balancing across multiple instances of your application, making it easy to scale horizontally without affecting the accessibility of your services.
Task 1: Working with Namespaces
Let's walk through the process of creating a Namespace for your Deployment:
Create a Namespace: Use the
kubectl create namespace <namespace-name>command to create a Namespace. Replace<namespace-name>with your desired Namespace identifier.kubectl create namespace project
Update Deployment Configuration: Update your
deployment.yamlfile to include the Namespace. Add or modify themetadata.namespacefield to specify the Namespace for your Deployment.apiVersion: apps/v1 kind: Deployment metadata: name: todo-deployment labels: app: todo-app spec: replicas: 2 selector: matchLabels: app: todo-app template: metadata: labels: app: todo-app spec: containers: - name: todo-app image: trainwithshubham/django-todo:latest ports: - containerPort: 8000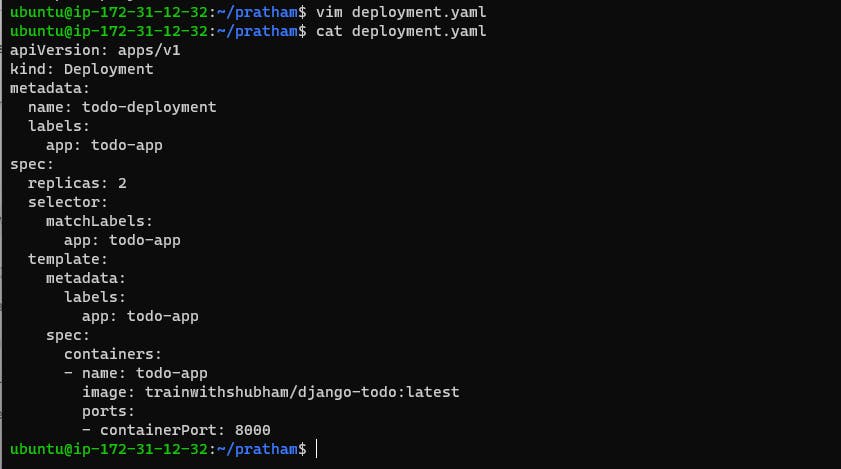
Apply the Deployment: Apply the updated Deployment configuration using the
kubectl applycommand with the-n <namespace-name>flag to specify the Namespace.kubectl apply -f deployment.yaml -n project
Verify Namespace Creation: Check the status of Namespaces in your cluster to verify that the Namespace has been created successfully.
kubectl get namespaces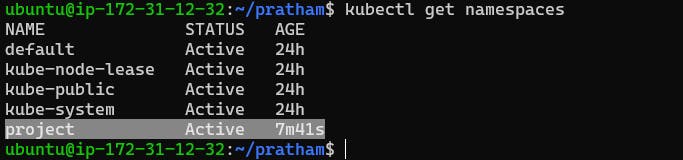
Task 2: Services, Load Balancing, and Networking
To deepen your understanding of Services, Load Balancing, and Networking in Kubernetes, delve into the following topics:
Services in Kubernetes:
In Kubernetes, a Service is an abstract way to expose an application running on a set of Pods as a network service.
Services enable communication between different parts of an application within Kubernetes.
There are several types of Services in Kubernetes, including ClusterIP (default), NodePort, LoadBalancer, and ExternalName.
ClusterIP exposes the Service on an internal IP within the cluster, NodePort exposes it on a static port on each Node's IP, LoadBalancer exposes the Service externally using a cloud provider's load balancer, and ExternalName maps the Service to a DNS name.
Services use selectors to determine which Pods will receive traffic based on labels assigned to Pods.
They provide a stable endpoint (IP address and port) that other parts of the application can use to communicate with the Pods.
Load Balancing in Kubernetes:
Load balancing in Kubernetes involves distributing incoming network traffic across multiple backend Pods to ensure efficient resource utilization and high availability.
Kubernetes provides built-in support for load balancing through Services.
When a Service is created, Kubernetes automatically sets up load balancing for the Pods that belong to that Service.
Load balancing can be achieved using different algorithms such as round-robin, least connections, IP hash, etc., depending on the Service type and configuration.
For example, in a ClusterIP Service, Kubernetes internally load balances traffic across the Pods using the selected algorithm.
Networking in Kubernetes:
Networking in Kubernetes involves managing communication between Pods, Services, and external resources.
Kubernetes uses a flat, virtual network that allows Pods to communicate with each other across Nodes regardless of their physical network location.
Each Pod gets its unique IP address, and Kubernetes manages routing and network policies to ensure connectivity and security.
Network plugins (CNI - Container Network Interface) in Kubernetes help implement networking features like overlay networks, network policies, and load balancing.
Popular Kubernetes networking solutions include Calico, Flannel, Weave Net, Cilium, and others, each with its features and capabilities for network management within a Kubernetes cluster.
By mastering Namespaces and Services in Kubernetes, you gain powerful tools for organizing and exposing your applications while maintaining scalability and reliability in your infrastructure.
I'm confident that this article will prove to be valuable, helping you discover new insights and learn something enriching .
thank you : )